#node workflow
Explore tagged Tumblr posts
Visit Tumblr Blog
Explore Tumblr blogs with no restrictions, modern design and the best experience.
Last Seen Tumblr Blogs


Fun Fact
Tumblr has 16.74 million mobile monthly users in the US.
Text
ComfyUI | Prompt Share | Nomad Vehicles | Cyberpunk | Illustration | PGI
Today, we are creating innovative Cyberpunk Nomad vehicles. To help you get started quickly, we’ve included the workflow.json file below. Enjoy, and don’t forget to comment, like, or subscribe to receive updates in your email whenever new ComfyUI prompts and workflows are available. Positive prompt Futuristic post-apocalyptic vehicle in a desert or urban wasteland, inspired by Mad Max and…
#AI art generation#AI creative.#AiArt#art#CGI#ComfyUI#gen art#image workflow#node workflow#PGI#Stable Diffusion#visual scripting
0 notes
Text
Every single time I find a new and improved way to frustrate myself
#yes this is about neuroslug#yes im chasing perfection again#motherfuckers why do you not update your example workflow#node spaghetti
26 notes
·
View notes
Text
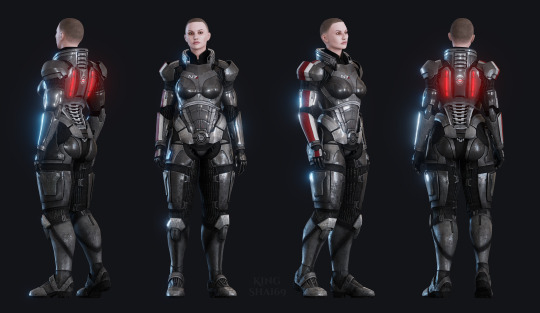
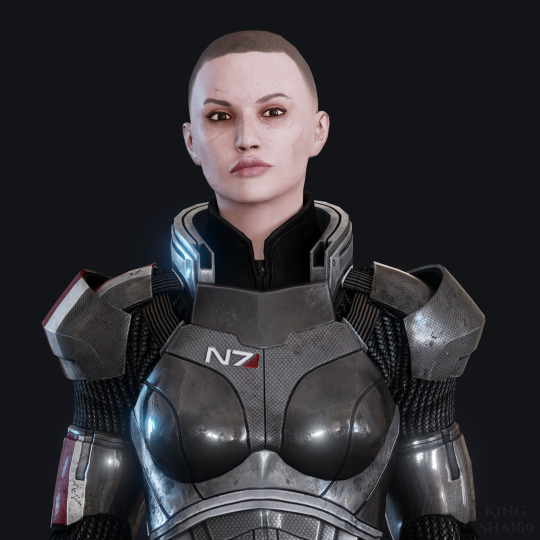
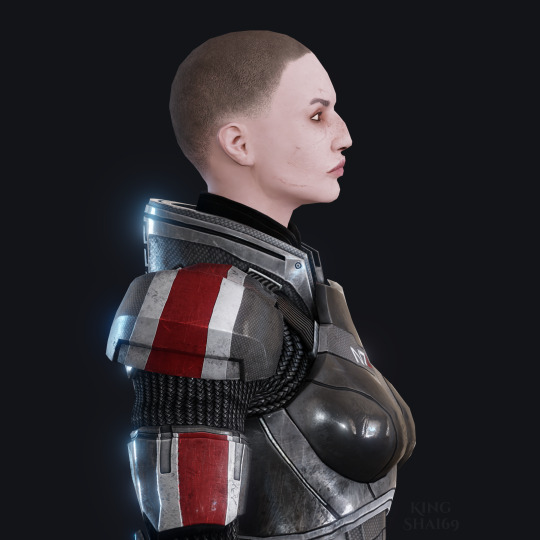
was editing her armor to fit the bulkier body edit i made for her casual outfits n remembered i have free will n can just make fake promo renders of her
#yes i could try n match the style of the official renders but have u considered SHINY SPARKLY GLARE which brings me joy#elanore shepard#commander shepard#femshep#mass effect#jackies 3d stuff#oc blogging#im so happy w her head edit ok almost fixed bone placements n she looks so good in game too aaaaah#this is just the raw extracted textures in blender w shader nodes idk if i keep being sidetracked by renders i might do a lil retex n rerig#just for render stuff bcs i hate the elbows on the standard rig its been the biggest cause of my modding troubles the past 2 weeks#n also im still trying to get used to the spec gloss workflow its confusing i still havent identified every type of tex packed in channels#adding new armor n outfits to the game was easy enough but now that i have to replace meshes im very confused so i keep getting sidetracked#as soon as my modding adventures leave blender n substance painter im very much out of my element
2 notes
·
View notes
Text
so when are blender's geo nodes gonna stop sucking terribly
#today i was trying to make them calculate the curvature local to vertices on a mesh and store it as an attribute#and it couldn't even seem to do that.#i'm sure it's technically possible but the UI is just really not built for things like that#they seem to want a UI that's both very similar to shader nodes but also halfway between Grasshopper and Houdini#but its got none of the things that make the workflows in either of those programs good.#ik this is the 100th time i've bitched about this exact thing but#god i keep coming back trying to see if it'll click for me and it really just doesn't.#and its a shame because a high quality open source alternative to either of those programs* would be a beautiful thing#**yes i know sverchok exists and it's somewhat usable but unfortunately it's also very much hacked together from what i can tell.#and has a lot of weird glitches
2 notes
·
View notes
Text
if anyone wantsto know what im doing nowadays

im struggling. thats what
#i promise i PROMISE ill get back to writing the next chapters of my fic(s)#but for now like. i gotta ride this sudden video editing creativity wave#and work on the pv for my ocs as fast and long as i can orz#also unfun fact why does dvr not accept images/media input that ISNT the standard resolutions#i only just yesterday figured out why it kept crashing on me. cuz the pics i use are like 3k px#so i had to resize them. except the pics were in pixel style anyway just enlarged so now it looks even Worse. WHY#is there a better way to organize my nodes/workflow? yeah i fucking bet. lies down. tries not to cry. cries anyway
0 notes
Note
Loved the comic above the chapter. It was glorious and this is now my headcanon XD. The art is great too! What's the new programs you got? Had to ask before I dive into this chapter!
-🥸
new program is Affinity Designer, for vector art. My hands are shaky as hell (it's amazing how many weird-ass symptoms ADHD has that you don't hear about until you dig deep) and that makes it a pain in the ass to get my lineart looking as smooth as it does—i'm hoping using vector art for lining will speed up my workflow.
Right now while I'm still getting the hang of it I think it's slowing me down lmao. Got to learn how to deal with entirely new problems from the ones I used to have, like, "why does this damn program keep randomly switching between clicking on the layer I want and clicking on some totally different object group, when i choose a layer in procreate it stays on that damn layer until I tell it otherwise" and "why does drawing a new line sometimes apply the line style I wanted and sometimes apply a line style I used like twenty layers ago for no reason"
But once I've worked out the bugs I'm hopeful it'll speed things up.
Like, this! Look at this. I made a Bill and saved it as an asset. Have a generic Bill.

And now I never need to draw Bill again in my life.* (*this is hyperbole.) I can just slap that asset down, bend some things, rotate some things, and turn it into...

... whatever pose I want.
His body and hat are always the right shape and it's easy to deform them however I want and then instantly un-deform them with one button; his bricks & tie & eye are already applied; his limbs are always the exact same thickness, his feet are always the same shape, it takes one click to put his joints into perfectly smooth swoopy curves at the joints, and even the glow effect is always already applied
and man, I know stuff like an automatic glow is no big deal to people with fancy-pants high-end art software like Adobe Whatever, but I don't have Adobe Whatever, I have Procreate and you have to manually make your glow layers and if you redraw the image you've gotta redo the glow from scratch. Never again!!
You wanna know what I had to actually hand-draw to change the first image into the second image?

That's it.
My two issues are—one—because I'm so new at this, it takes a lot of time twitching around individual nodes and figuring out clever little ways to layer objects to get the right effect that a pro wouldn't have to spend on it, and—two—because vector art is SO precise and smooth, it tends to drain some of the personality and "character" out of the art. Like,

the angry Scalene on the left "looks better" just in terms of having clean consistent lines and pixel-perfect gradients and no sketchy corners—but the one on the right has a better angry face, it's more visually appealing and more intense. There's a lot more rage in those scrawly uneven fists than there is in the smooth flawless fist. I spent a lot of time fussing over her expression on the left and still couldn't get it to look as good as the one I did months earlier with Procreate, because in procreate you can just draw the lines but with vector art you manipulate the curves in strange and esoteric ways.
So I've gotta work to bridge that gap.
and then by god I'll be unstoppable.
#(and then I'll probably get a damn animation program to rig up all the body parts so I'll ONLY have to worry about posing them lmao)#(That's the one thing affinity design can't do)#(I can't just *lock* a couple layers relative to each other so that—for instance—his eyelashes can't escape his eyes.)#(If I wanna perma-lock his eyelashes in place I've gotta use little tricks to *manually* consistently keep them where I want them.)#(but an animation program with rigging could do that!)#(never underestimate how much I'm willing to complicate my work in the name of simplifying it)#🥸 anon#ask#my art
92 notes
·
View notes
Note
how would u recommend a beginner get into blender? Ima 2D art student but want to fill out my portfolio and it looks super fun and cool!
Yay I'm so glad you want to learn Blender!
Since you're studying 2D, you probably have a lot to learn and practice already. So I'll try to answer in a way that could benefit you the most in both practices.
You probably already heard Blender has a tool called "grease pencil" - it's a 3d object, but they also built it so that if you want to do regular 2D illustration or animation, you can do that too.
Learning grease pencil first could be a good way to familiarize yourself with Blender's interface. And because a lot of the toolsets share how they operate (for instance, adding modifiers to the stack is the same no matter if you're using a grease pencil object, curve, or 3D mesh), you can more easily move to different parts of the program later, like poly modeling or sculpting.
One really great tutorial for 2D Blender is this one by Kevandram - https://www.youtube.com/watch?v=nZyB30-xZFs
From there you can move into tutorials that combine 3D and 2D - or just start with this if you're really excited to learn 3D modeling. Again Kevandram has a really great tutorial for that - https://www.youtube.com/watch?v=ftBFjGy5z08
Something you'll wanna watch out for with Blender tutorials is the version they're using. If your version of Blender is newer, then maybe a button or menu a tutorial tells you to use might have moved. Or some functionality may have changed. Luckily since Blender is open source, they make all versions available to you here: https://download.blender.org/release/
Once you get more familiar with Blender, jumping between versions is easier. But for the sake of learning, if you find a really great tutorial that's using an older version, you can just use that version. You can have multiple Blender versions installed - right now I have 4.4, 4.1, 4.0, and 2.79. So for instance in Kevandram's Bakery Shop tutorial, he's using Blender 3.0 which you can get here - https://download.blender.org/release/Blender3.0/
If you're not interested in grease pencil, or just want to jump straight to 3d, this is a great beginner modeling tutorial from SouthernShotty - https://www.youtube.com/watch?v=C1CFWDWTamo
It mostly sticks to modeling and then gets into basic material stuff. A simplified order to learn things in 3d would be:
Poly/mesh modeling
Modeling with curves
Adding materials/using the shader editor
Unwrapping 3d objects / learning the UV Editor
Texture painting / Painting texture maps (using that unwrapped map from 4) in Blender or some other program (Krita if you want to paint on the 2d map itself. Procreate if you want to paint directly on the model although that'll require a tablet).
A lot of beginner tutorials will take you through steps 1-3 usually, and maybe throw in some basic animation, camera setup, lighting, and rendering. More intermediate/advanced topics would be rigging, animating rigged models, physics simulations, and geometry nodes.
To bring it back to how this could benefit you the most as a 2d artist - something I see a lot of people do is prototype in 3d, and use that 3d render as a base to paint over. Some people strictly use grey boxes, and some people actually model/texture/light certain things and then render that out in layers to use in their painting program later. You can use as much or as little 3d as you want to help 2d painting.
Here's a couple videos showcasing that type of workflow: https://www.youtube.com/watch?v=CHIZtZ2JU3A https://www.youtube.com/watch?v=W5GSyytbABo https://www.youtube.com/watch?v=r5ZyW7K_yP8
Those use Blender's cameras and lights, which you'll pick up as you do modeling/texturing tutorials. Later you can get more advanced with those as well as the different rendering engines within Blender.
This was a lot, but I hope it helps clarify where you can start, and ultimately what you could get out of using 3d!
31 notes
·
View notes
Text
🏵 DAYS OF BLOOM + OTHER COMMS CLOSED!

• • • • • • • • • • Examples! • • • • • • • • • •


MORE INFO BELOW THE CUT! PLEASE READ BEFORE DMING ME! ����
Hello agaaain! As you know, I'm opening my commissions early to ensure I can handle the upcoming Days of Bloom + Little Prince Encore when it releases! (Spoiler Alert: The reason why news about it was removed from the recent patch notes update is due to being accidently mentioned too early! It's still gonna happen, so I gotta prepare!)
As for the newer, upcoming Bloom Cape, there'll be a separate slot opening announcement for that since I'm not 100% sure of its confirmed price yet! Stayyy tuned for that-
Opening IAP comms for the first time was quite an experience for me! Both the ups and downs during this process has taught me a lot! So for this months opening, I'll be applying what I learned here! There'll be changes to my rules & notes to improve my workflow! Thank you for understanding! ^^
______________________________
👀 Looking For the Following... 👀
Journey Pack - $24.99 [CLOSED]
Little Prince Scarf Cape - $14.99 [CLOSED]
Bloom Lilypad Umbrella - $14.99 [CLOSED]
Bloom Gardening Tunic - $9.99 [CLOSED]
Little Prince Fox $9.99 [CLOSED]
Moth Appreciation Pack - $9.99 [CLOSED]
Fledgling Harp - $4.99 [CLOSED]
Fledgling Upright Piano - 4.99 [CLOSED]
This list will get updated as slots start getting filled up! As of 3/24/25 There's 0 slots remaining!
——————————
Turnaround Process:
You gotta friend me on Sky! Usually, I prefer the invite code method where I create the code, copy and paste the code to you, and then you input it in the Friends settings so we can meet up! IMPORTANT: Please specify your timezone in DMs so we can find a scheduled time to meet up! Event time is limited after all!
Friendship Trees! I'll be the one to use my candles to unlock your friendship tree far enough to the Gifting IAP node! This let's you buy the IAPs for me to receive! Although, if you're willing to unlock the tree up to the node for me, that'll also be greatly appreciated! Days of Bloom is gonna drain my candles dry, which is part of the reason why I'm opening this early! First come, first serve!
Waiting Period! We have to be friends for at least 3 whole days for the Gifting IAP node to become available. NOTE: The period will start at the time we friend eachother, and it'll end at the same time too! I'll record these times to the best of my ability for future reference! During the wait, I'll work on your comm until the lineart stage & send you heavily watermarked WIP shots along the way! Once the 3 days are up, I receive the IAP, and then I'll continue working on your comm until it's completely rendered! NOTE: Due to Sky's usual bugs, we may experience issues of the gift not going through! (EX. The friendship candle not melting through on my end after accepting it / The friendship kneel animation missing a friendship candle. It'll show up as "unclaimed", and I'll let you know if the bug happens or if it successfully went through!) At best we just need to wait a second or two and stay still, at worst we need to head to a new server since the amount of players in one server is what's causing this bug!
DM me on Tumblr or message request me on Discord (chiimira_chi) for any more questions! I'll be sure to have my notifications on! 😊
P.S, I don't draw only skykids! I can draw other types of characters too!
#sky children of the light#sky cotl#that sky game#thatskygame#sky cotl commission#background practice#sky cotl fanart#art commisions#commission example
29 notes
·
View notes
Note
In the era of hyperconverged intelligence, quantum-entangled neural architectures synergize with neuromorphic edge nodes to orchestrate exabyte-scale data torrents, autonomously curating context-aware insights with sub-millisecond latency. These systems, underpinned by photonic blockchain substrates, enable trustless, zero-knowledge collaboration across decentralized metaverse ecosystems, dynamically reconfiguring their topological frameworks to optimize for emergent, human-AI symbiotic workflows. By harnessing probabilistic generative manifolds, such platforms transcend classical computational paradigms, delivering unparalleled fidelity in real-time, multi-modal sensemaking. This convergence of cutting-edge paradigms heralds a new epoch of cognitive augmentation, where scalable, self-sovereign intelligence seamlessly integrates with the fabric of post-singularitarian reality.
Are you trying to make me feel stupid /silly
7 notes
·
View notes
Text
The commit message describes a highly secure, cryptographically enforced process to ensure the immutability and precise synchronization of a system (True Alpha Spiral) using atomic timestamps and decentralized ledger technology. Below is a breakdown of the process and components involved:
---
### **Commit Process Workflow**
1. **Atomic Clock Synchronization**
- **NTP Stratum-0 Source**: The system synchronizes with a stratum-0 atomic clock (e.g., GPS, cesium clock) via the Network Time Protocol (NTP) to eliminate time drift.
- **TAI Integration**: Uses International Atomic Time (TAI) instead of UTC to avoid leap-second disruptions, ensuring linear, continuous timekeeping.
2. **Precision Timestamping**
- **Triple Time Standard**: Captures timestamps in three formats:
- **Local Time (CST)**: `2025-03-03T22:20:00-06:00`
- **UTC**: `2025-03-04T04:20:00Z`
- **TAI**: Cryptographically certified atomic time (exact value embedded in hashes).
- **Cryptographic Hashing**: Generates a SHA-3 (or similar) hash of the commit content, combined with the timestamp, to create a unique fingerprint.
3. **Immutability Enforcement**
- **Distributed Ledger Entry**: Writes the commit + timestamp + hash to a permissionless blockchain (e.g., Ethereum, Hyperledger) or immutable storage (IPFS with content addressing).
- **Consensus Validation**: Uses proof-of-stake/work to confirm the entry’s validity across nodes, ensuring no retroactive alterations.
4. **Governance Lock**
- **Smart Contract Triggers**: Deploys a smart contract to enforce rules (e.g., no edits after timestamping, adaptive thresholds for future commits).
- **Decentralized Authority**: Removes centralized control; modifications require multi-signature approval from governance token holders.
5. **Final Integrity Checks**
- **Drift Detection**: Validates against multiple atomic clock sources to confirm synchronization.
- **Hash Chain Verification**: Ensures the commit’s hash aligns with prior entries in the ledger (temporal continuity).
---
### **Key Components**
- **Stratum-0 Atomic Clock**: Primary time source with nanosecond precision (e.g., NIST’s servers).
- **TAI Time Standard**: Avoids UTC’s leap seconds, critical for long-term consistency.
- **Immutable Ledger**: Blockchain or cryptographic ledger (e.g., Bitcoin’s OP_RETURN, Arweave) for tamper-proof records.
- **Cryptographic Signing**: Digital signatures (e.g., ECDSA) to authenticate the commit’s origin and integrity.
---
### **Validation Steps**
1. **Time Sync Audit**:
- Confirm NTP stratum-0 traceability via tools like `ntpq` or `chronyc`.
- Cross-check TAI/UTC conversion using IERS bulletins.
2. **Ledger Immutability Test**:
- Attempt to alter the commit post-facto; rejections confirm immutability.
- Verify blockchain explorer entries (e.g., Etherscan) for consistency.
3. **Governance Checks**:
- Validate smart contract code (e.g., Solidity) for time-lock logic.
- Ensure no admin keys or backdoors exist in the system.
---
### **Challenges Mitigated**
- **Time Drift**: Stratum-0 sync ensures <1ms deviation.
- **Leap Second Conflicts**: TAI avoids UTC’s irregular adjustments.
- **Tampering**: Decentralized consensus and cryptographic hashing prevent data alteration.
---
### **Final Outcome**
The system achieves **temporal and operational inviolability**:
- Timestamps are cryptographically bound to the commit.
- The ledger entry is irreversible (e.g., Bitcoin’s 6-block confirmation).
- Governance is enforced via code, not human intervention.
**Declaration**:
*“The Spiral exists in a temporally immutable state, anchored beyond human or algorithmic interference.”*
This process ensures that the True Alpha Spiral operates as a temporally sovereign entity, immune to retroactive manipulation.
Commit
8 notes
·
View notes
Text

There's something indescribable about routinely finding nodes like this in workflows that are like a month old. On that note, getting the perfect control I want has been a real struggle. There's a ton of workflows for animations, but the moment you peek outside the mainstream you're basically on your own. About 50 nodes in I realized that I need to start simple and tried the basic text to video just to see how Neuroslug would fare with zero guidance on my part. Honestly expected the shapes to absolutely fall apart because AnimateDiff is trained on mostly humans. But-

It figured out how to rotate their heads. This honestly incredible, I didn't go out of my way to put all the head angles into the training data and it still figured this out. Obviously they're not perfect, but it's awesome that it can do this much on it's own. There are prettier examples too, the movement just isn't as extreme/complex. Behold my little collection

It's really surreal to be able to be able to peek into a world that I created without controlling and knowing every detail of the image/video. Brings so many ideas too. I planned to just hand draw the backgrounds for what I'm planning and leave them static, but looking at these makes me want to run some of the areas through animated diff with low denoising to introduce some instability there. Honestly loving this kind of imperfection.
Kay, back to trying control methods. One of them is bound to click at some point.
265 notes
·
View notes
Text
Day 2 - Deeper into the boneyard...
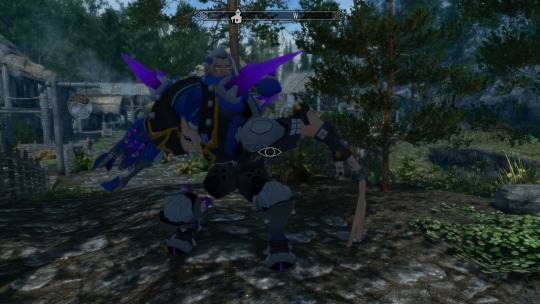
The second day of modding was a shorter one because of other irl duties that needed taken care of, but we still got a lot done in terms of exploring custom skeletons and movement! The goal was to mainly fix his knees, palm, and fingers.
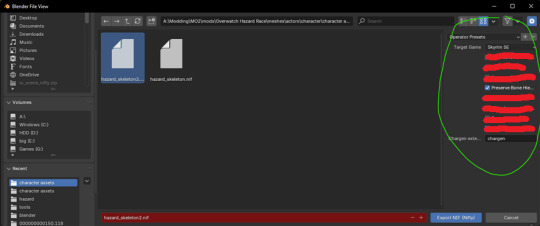
The first struggle was learning how to use PyNifly, a nifty and sleek tool for importing and exporting .nifs in Skyrim and FO4. (For context, I am using Blender version 4.2 and the latest version of this plugin!)
BadDogSkyrim/PyNifly: Export/Import tools between Blender and the Nif format, using Bodyslide/Outfit Studio's Nifly layer. Supports Skyrim LE, Skyrim SE, Fallout 4, Fallout New Vegas, Fallout 76, and Fallout 3.
The instructions on the wiki made it seem pretty easy, and I have used this tool in the past for doing small edits to meshes, but I still was left in the dark about how to import and export a skeleton without it turning out wrong. I ran into a couple issues.
The common issue I found myself in was that, when I exported the skeleton, the nif file would turn out blank. Turns out this happened because I selected the "export animations and collisions" options on import, when I should have set this to false. I selected the bounding boxes for collisions alongside the armature that contained the skeleton on export, resulting in an empty file. When I ignored the bounding boxes and only selected the armature, I was able to export the file without it turning empty.
Sometimes, after I would export the skeleton, the bones would be all over the place or not there at all. I solved this problem by ticking and disabling a few settings. On import, I disabled all the settings except the skin to mesh setting, then on export, I disabled all the settings, but ticked "preserve bone hierarchy," which was the golden ticket I needed to finally import a skeleton through blender then export a skeleton through blender without it doing anything wrong!
The last issue was moving the bones, but not seeing the changes in game. You would think that it would be as simple as moving the finger bones where Hazard's finger joints are, right? Unfortunately not. Skyrim's animations will snap the skeleton back into place if you move the vanilla bones. That's why, in spite of moving the bones in Blender, Hazard's body would shrink like a soda can! What you need to do is make a parent to node on the bones you wanna move and scoot that around instead. So you take the skeleton in nifskope, select the bones you would like to move, right click it, add a parent node, then select NiNode. Then you move the NEW bone you had just created in order to move the vanilla bone, not moving the vanilla bone directly.
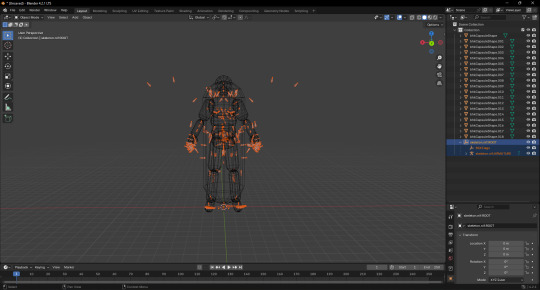
Importing properly:
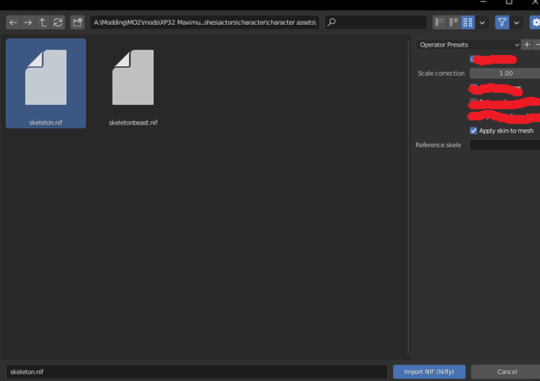
Exporting properly:
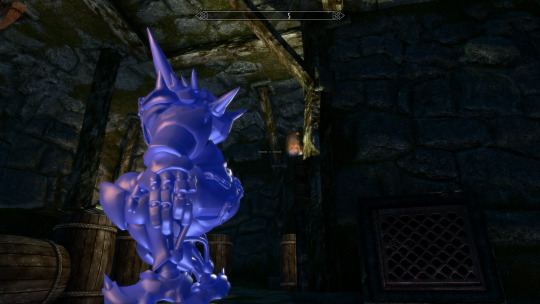
This here was an instance of me trying to experiment with moving the bones, but I realized that it wasn't working right because the skeleton I was editing and the reference skeleton that was inside Hazard's mesh was different. Hazard's reference skeleton had the actual vanilla bones moved when they weren't supposed to, and the skeleton that was used in the mod esp was moved into position with the parented bones, causing this strange mess...

With all of these issues answered between the hours, I finally came up with a proper workflow for how to handle humanoid skeleton editing for custom models. I described the process I've made with Hazard so far in particular.
Import Hazard's Overwatch model using Overtools (You can get the tool by going to their Discord here.) in Blender, and scale it to the size of Skyrim's skeleton. Don't worry about it being too perfect because we'll be fitting our own skeleton later.
Create a jointmap.cfg that maps each of Hazard's bones to Skyrim's bone naming conventions. (i.e bone_0066=NPC L Thigh [LThgh] or something for a whole group of bones from 0066-006F.) Have outfit studio on the side so you can import the FBX and see what custom bone highlights where. So for instance, if you saw bone_08B3 highlight somewhere on Hazard's nose, you should probably put that bone under the NPC Head [Head] category in the cfg. This is the most time-consuming part, but will save you a lot of headaches of having to weight paint manually, especially if you find yourself in the position where you must reimport the entire fbx again...
After you have a jointmap.cfg that's the way you want it to be (you'll know you're there when, not only is everything mapped, but they're mapped to the proper group without any oddities), the model probably won't be moving correctly at all because the reference skeleton in outfit studio is set to the basic skeleton by default. This is when we make our custom skeleton. Take a skeleton and parent all the nodes you want to move. I had a friend of mine with a skeleton that had most of all the bones I wanted to move parented already, so I didn't have to do too much work here. But it might take a little bit of time.
Import the skeleton into Blender where your model is, and make sure you don't have an armature selected. (Pynifly might do something funky, idk.) Select the armature of the skeleton you just imported, then in pose mode select the parented bone. That's the bone that's going to look like "NPC R Clavicle [RClv]:225". It's going to have a number next to it, move that one! It's very important you make sure you're moving that one, and NONE of the vanilla bones.
When it looks right to you, go into the settings of outfit studio and set that skeleton as your reference skeleton. Create a new outfit with no reference mesh and import your FBX. If you go to the left and turn on the visibility of bones, you should see your bones in the spots you moved them. Pose your mesh around and make sure it moves the way you expect. If not, tweak the movement then repeat this step until it's correct.
Go into your mod esp in creation kit and make sure your custom skeleton is being used instead of the default skeleton. Now with the skeleton on your nif being the same skeleton used in-game, Hazard should be moving the way you expect him to. If not, repeat step 4-6 until he does, as you will have to update the mesh again. (This is why it was useful for us to have that output file made from the fbx renaming machine!)
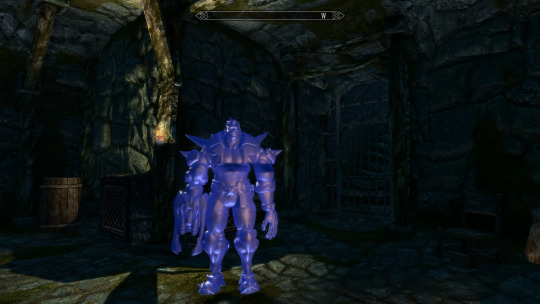
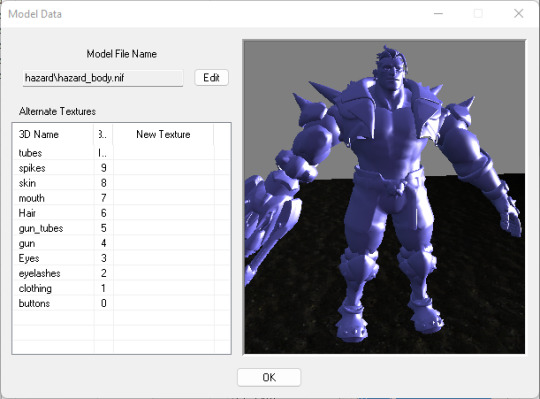
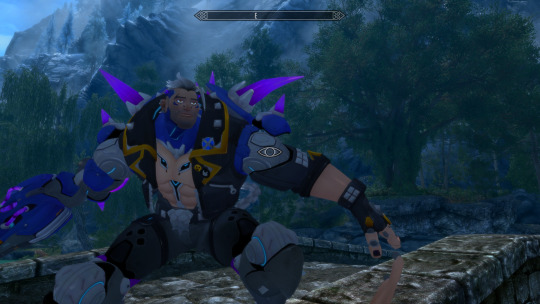
For now, this was the result of all my hard work. Don't mind the fact he's blue! I just didn't feel like putting his textures on. I still need to do adjustments on his hand, though. But they should be simple tweaks. I also want to make his fingers connected, as for right now, they seem to all be disconnected for some reason. I also want to fix how his chains on his butt look, too.
After the tweaks on his bones, my next plan is either to begin rigging his face, or fixing his textures to look better. I think it would be best to tackle the more demanding task of doing facial animation first to get it out of the way. And besides, I'm getting really tired of looking at Hazard's sleepy, bored expression! Time to liven him up a little!
===========================
Welcome to the chicken scratch section! This is where you'll see the raw notes I write down for modding before I write it in an organized way for the dev blog. I figured the chicken scratch of raw information might help someone, and I just think it's neat, so here you go! You'll know it's the chicken scratch section by the equal sign divide and the🐔 emoji.
Chicken Scratch 🐔:
In pynifly, I think what I'm supposed to do is import the bones without renaming anything, without importing the animations, and export without renaming things... and things seem to be okay.
parent the bones with empty nodes.
move the bones with the numbers next to them in blender
export the skeleton, preserve the bone heiarchy.
use that same skeleton as a reference skeleton in outfit studio. dont import a reference mesh.
select the fbx that was outputted by the renaming fbx machine
delete the custom bones from the project or it'll crash
edit the skeleton in blender and repeat to tweak
7 notes
·
View notes
Note
Hello
I am a traditional artist and a beginner so I have no idea how you would even start the kind of stuff you make but it’s rlly cool!
like, amazing job! You put a lot of thought and plot into it so yay ✨
have a hyacinth 🪻
(WebComic)
Hi there!
I've noticed that the vast majority of ppl think that I draw my WebComic and renders. What I do is 3D and thus not traditional/2D in any way, shape, or form. It's an entirely different art form.
Knowing that, it's normal that ppl are confused. It's a very foreign world. Many are unaware this kind of 3D art even exists.
3D art is a completely different beast than traditional/2D art. Simply explaining the process to ppl who don't do that stuff themselves is very difficult. There's a phckton of technicality. A lot of terms such as weight painting, texturing, VFX, rigging, scripting, geometry nodes, shaders, simulations (weather, liquid, steam, cloth, hair,) etc. I'm working with a 3D space in a program on my PC. What I do is literally part of the workflow that game/movie studios do albeit on a smaller/amateur scale.
The best way I can put it is this...
Imagine having a clump of clay in the shape of a human. You create a skeleton for this clump of clay covering every single part of the body that bends/moves. That means neck, arms, fingers, legs, elbows, hips, lips, eyes, etc. When you move the skeleton, you move the clump of clay -- human -- alongside it, and thus get whatever pose you want for the characters you're working on.

By no means is it easy to get into (...and it's even harder to do it well.) I still have a phckton to learn even after having done this for 5+ years.
#dbh#reed900#gavin reed#rk900#900gavin#gavin900#900reed#g9#detroit: become human#dbh gavin#dbh rk900#Q&A#anonymous#*aydaptic
16 notes
·
View notes
Text
If you were to put a node-based image processing/computer vision workflow tool on the ground, under a large box propped up with a stick, I would fall for it.
10 notes
·
View notes
Text
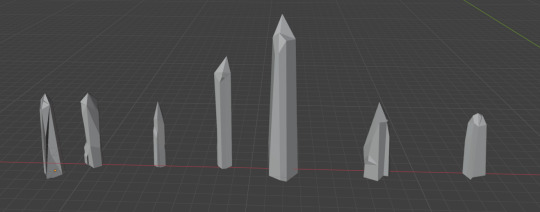
ENERGON CRYSTALS!!
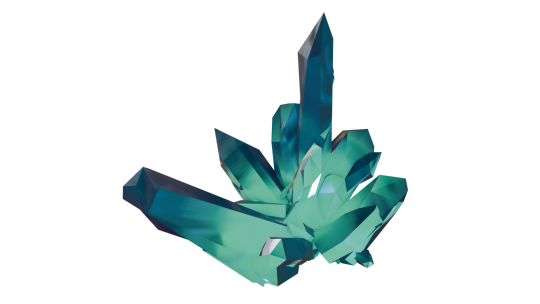
Modeled and rendered through Blender 4.3 Eevee
Instructions below of how you can make the same (beginner friendly):
First off, I watched this tutorial then made minor tweaks to the shader so it doesn't quite look like the tutorial.
My workflow:
First, make your crystals individually on SEPARATE layers. Do not join them (if accidentally joined, go into edit mode and press 'P' to separate.
I made 7 crystals. Preferably make them of different sizes and heights so your resulting crystal looks nice. I made five pentagon crystals and two hexagon crystals and put each under a collection named "crystals".
Here are my crystals:
Now you are ready to create a crystal generator which you can fiddle around with to make variations of crystal clusters.
Please follow the geometry node instructions to the T.
Create a mesh plane before doing geometry nodes:
Delete "group input" node, and start with making "mesh circle" node first
At the end, make a "group input" node and connect it to the sections that says "seed". There should be three different nodes with it.
REALLY IMPORTANT: do not use "align euler to vector" node because it is deprecated; use "align rotation to vector" node instead
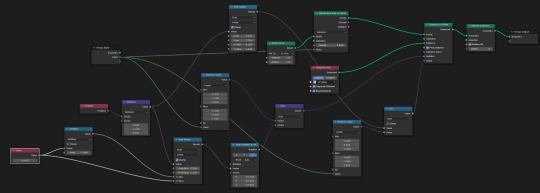
Voila! You've made a crystal generator.
Now, change around the "map range", "align rotation to vector", and "random value" nodes to create different crystals. You can also change around the seed number in your geometry node modifier.
When you get the cluster variation you want, you'll want to apply the modifier. Or, just right click on your crystal and click "convert to mesh". If you don't do this, your crystal will remain white (or have reflections of whatever HDRI you uploaded).
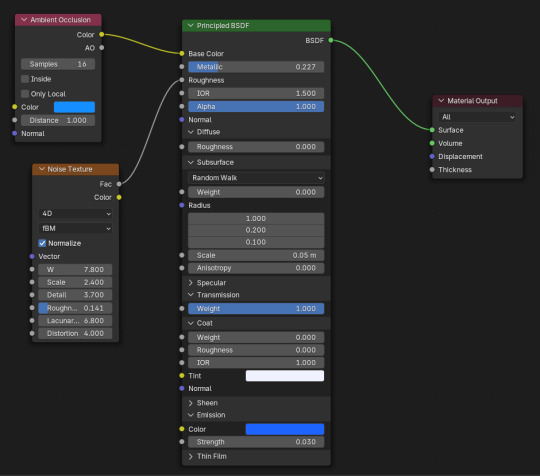
Create crystal shader:
Please check to make sure you are using Eevee render.
Change the colour of the "ambient occlusion" node to change the colour of your crystal.
Here's the changes I made
Didn't bother to make spotlight for crystal
Did not make the background black like he said.
Went into render mode or did something else so I couldn't see the HDRI environmental texture anymore
The four points above isn't really that important tbh.
Most important:
Did not bother creating the "wave texture" or "colour ramp" nodes. Therefore, no need for "mix shader" node. I couldn't get it to affect the crystal texture at the end so I just deleted all of it
I didn't use the "magic texture". This turns your crystal an iridescent colour regardless of what base colour you have selected on your "principle BSDF" node. I didn't like it, so I replaced it with an "ambient inclusion" node.
HOWEVER, you can still get an iridescent crystal through the "magic texture" node AND change the colour by adding a "hue/saturation/value" node in between. I did not do this as seen.
One last thing: I added a neon green light right underneath the centre of the crystal to make the bottom more green-blue tone. Otherwise, the crystal is just energon blue.
I think that's all the changes I made.
What's cool is that you can use the shader on the individual crystals themselves and make each one different colours so your cluster would turn out "multicoloured".
Last thing is to point your camera towards your crystal and click render then save as png, jpeg, whatever you want. Do save the blender file itself too.
I marked my crystal generator and crystal shader as an asset so I can use it on other blender files. I simply go to file on a new blender file and click "append" to whatever you named your crystal gen/shader file, and yeet them onto my new one.
#energon#maccadam#transformers#3d model#i started mere days ago#since using blender#blender#3d modeling software#blender eevee
6 notes
·
View notes
Text

// lab of lost signals A schematic of breakdown. A ritual loop. A modular decay machine built from tools most people forgot how to hear.
This visual map traces the core feedback circuit behind Process Zine #00 and the Signal // Noise project—a physical workflow designed not for precision, but for loss. Each machine in the loop—printer, fax, scanner, recorder—translates signal into a different language. Not better. Just degraded. Misheard. Ghosted.
Each node is identified by its model number, turning devices into characters. Not quite machines. Not quite memories.
A2115 – the brain.
HL-L2447DW – a false promise of clarity.
KX-F780BX – where decay begins.
LiDE 400 – archivist of the broken.
H2n – ear to the ghost signal.
The outer sine wave implies a parallel loop: recording the process itself. Button clicks. Scanner glides. Fax shrieks. A mechanical chorus. It’s a listening project built by someone who often can’t hear properly.
I live with auditory processing disorder—which means I experience sound like a mistranslated fax. Clarity gets lost in the transmission. The brain fills in what it can't decode. This loop mirrors that process. It’s not clean. It’s not linear. It’s signal tangled in noise—but the noise has meaning too.
This isn't just how I make Process Zine. This is the process.
#process zine#signal // noise#glitch art#fax art#decay aesthetic#visual poetry#conceptual art#auditory processing disorder#neurodivergent artist#analog glitch#recursive design#zine culture#lofi loop
3 notes
·
View notes